
Did you know that a doorway is one of the biggest culprits to excess noise in a home? Doorways usually have a hollow door, large gaps, and many other ways for sound to travel through easily.
This makes doorways a prime enemy when it comes to soundproofing almost any room in your home.
If you really want to soundproof an area in your home, you will need to make sure the doorway is properly sealed first and foremost. After many hours of research, I have found the best way how to soundproof a doorway.
You can do the best job soundproofing a room’s wall, ceiling, and floor, but if you do a poor job with the doorway, then all your efforts can be for nothing.
The main two things to focus on are creating a complete seal around the door and adding density. Sound has a difficult time traveling through dense objects.
If sound can’t easily travel through something, then it will find the path of least resistance. This is where sealing all gaps and cracks comes into play.
There are many techniques and methods that you can try, but some just work a lot better than others.
If you do a good enough job of this, you will be able to really dampen and absorb any excess noise trying to penetrate through a door. Here are the best ways to make your doorway impenetrable to sound.
Create a Complete Seal Around the Doorway
Before you even think about anything else, the first step to take is to create a seal around your entire doorway. I stated earlier that sound would travel through the path that has the least resistance.
Gaps and cracks that are present in your doorway are one of the main ways sound escapes your room.
In order to fix this problem, we will need to completely seal off all of the gaps and cracks around the door, similar to how a car door or window works.
Have you ever looked at your car door when it is open? There is actually a rubber seal that goes all around the door.
When the door is shut, the rubber seals off all the cracks in your car door to keep wind noise and sound out.
We will be doing something very similar to this with your doorway. Creating a rubber seal around the door frame will ensure that air and noise cannot enter or leave.
There are essentially four areas on your door that you will have to work on in order to do this the right way.
The first three areas are the left, right, and top sides of the doorway. These will all need to be sealed off first.
After the top and the sides of the doorway are sealed, we will then need to move to the gap at the bottom of the door.
The gap at the bottom of a door is the main culprit for sound getting through a door which we will need to spend extra attention on.
All areas of the door should be dealt with with precision and care. Doing a crappy job at sealing any one area can be the reason why your soundproofing fails. Let’s move on to sealing the sides and the top of the door frame.
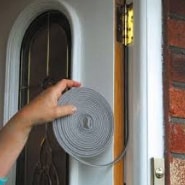
Use Weatherstripping Material Around the Entire Door Frame
Weatherstripping is commonly used on home windows, car doors, and many other places that need a tight seal.
I recommend this weatherstripping door kit from amazon to seal your doorway in question. This kit is great because it comes with a door sweep as well, which is something I will talk about after this.
Weatherstripping your door frame has many benefits. One of these benefits happens to be soundproofing.

Not only will it prevent soundproofing, but it will also help keep insects, dust, and dirt from entering through the door.
This means that weatherstripping is actually practical to use other than just for soundproofing.
Another added benefit that many people fail to mention is that it also helps save money on heat and air conditioning.
It can help keep a room cold or warm depending on the weather because it is effectively a form of insulation.
So how do you install the weatherstripping around your door? This kit makes it fairly easy to do. Let’s take a look at the basics.
The kit comes with 39′ of weatherstripping material and is 1′ wide. This is enough to seal almost any doorway. Here’s how to install it in 3 easy steps:
- Clean Your Door Frame – The first thing you need to do is make sure that your door frame is completely clean of dirt and debris. Take a washcloth or rag and wipe down the door frame with soapy water. Make sure the door frame is completely dry to ensure good contact with the weatherstripping material.
- Measure All the Sides of the Door Frame – You can simply do this by placing the weatherstripping tape along each side of the door frame without sticking it on and making a mark on where to cut it off at each point. Make sure to have a little extra strip on each measurement, just in case. It’s always better to have too much than too little. Marking and cutting the strips makes installation a lot easier and more precise since you won’t need to hold the entire product in your hand while installing. Instead, you will be left with three easy-to-place strips.
- Install Each Strip to the Three Sides of the Door Frame – Start with the left side of your door frame, then move to the top, then lastly, the right side. Be sure to cut off any excess weatherstripping material in the process. You don’t want to leave any hanging pieces of weatherstrip because this will make the seal ineffective.
Here is a good video demonstrating how to weatherstrip a door:
Install a Door Sweep at the Bottom of the Door

Don’t stop yet; your door is still not completely sealed. We are still left with the door sweep.
If you decided to purchase the above kit that already comes with a door sweep, then you are already ready.
If you decide to go with a different type of weatherstripping, then I recommend using a door sweep like this one.
What exactly is a door sweep?
It’s a piece of rubber placed at the bottom of the door that is flexible enough to allow your door to still open and close.
This effectively creates a seal at the bottom of your door while still allowing it to keep its functionality. What’s the use of a door that can’t open anymore?
This is why you need a door sweep. A door sweep has the same benefits as weatherstripping. It will help keep unwanted guests from crawling into a room, as well as help with insulation and soundproofing.
Installation is simple. If you have the door sweep from the above kit or you purchase the one I mentioned here, both have an adhesive backing.
Measure the bottom of your door and cut the door sweep to the correct length. Remove the backing from the adhesive and stick it on your door.
Be sure to install it with a good seal. Try not to make the seal too tight to where it’s hard to open your door, and also, don’t place it too high to where the sweep barely touches the ground.
You are looking for a good middle ground to make sure it will work properly and not hinder your day-to-day door opening experience.
Add Thickness and Density to the Door
Once you have completely sealed your door frame, it is time to add some thickness. What does adding thickness to your door actually do anyways?
The thicker the mass of an object means, the harder it will be for sound to penetrate through. There are a few ways you can go about thickening a door.
This all depends on the amount of money you are willing to spend on it.
There is the expensive way where you replace the entire door altogether, and then there is the cheaper do-it-yourself way by using an industrial blanket or soundproof panels.
Both ways will yield similar results, but obviously, one way sacrifices aesthetics for price and vice versa.
Adding thickness to your door coupled with a good seal around the door frame results in a pretty well-soundproofed door.
There may be other ways to add thickness to your door, but I find these two methods the most practical. Another thing you can also do is add soundproof panels on the door.
Soundproof panels help reduce echo and absorb sound. There are a few types of panels you can install. I personally recommend using either soundproof foam or acoustic panels, that I will mention later on.
Add Density Using a Thick Industrial Blanket

Installing an industrial blanket on your door to add thickness is a very cheap and effective way to tackle this situation.
This industrial blanket is perfect for this scenario. There are a few things you need to think about when using a soundproof blanket on your door.
First, you need to make sure it is thick enough to actually help block sound.
The next thing you need to worry about is how you are going to hang it on your door.
You have a few options when it comes to doing this.
This specific industrial blanket has grommets on it, which makes it easy to hang on the door.
You can hang the blanket on the door with either nails or screws. The main issue with both of these methods is that you will be leaving holes in your door if you were to ever take down the blanket.
This means permanent damage to your door. I do not suggest doing this unless you really have to.
What I recommend is using adhesive hooks like these from amazon. These hooks simply stick to your door without you needing to screw or hammer anything in.
Each hook can hold up to about 13 pounds. This may be an issue if you were only installing one hook, but the blanket has multiple grommets.
You will not be installing only one hook. You will install as many hooks as it takes to completely cover your door with the blanket. The more hooks you use, the more secure the blanket will be on your door.
Install Soundproof Foam Panels on the Door

Another option you have is to install soundproof foam panels on the door.
Soundproof foam works a little differently than a blanket because it isn’t the density that helps reduce the noise.
It is actually the way the foam is made that allows it to reduce sound. Soundproof foam is known to absorb and reduce echo, which is why they are widely used in music rooms. Installation is very simple.
You will need to stick the soundproof foam panels on the door with some type of adhesive.
Again, avoid using nails or screws because those will damage your door with installation. The main drawback to using soundproof foam panels is that they are not aesthetically pleasing to the eye.
Foam on a door isn’t the best-looking kind of decoration. It may make your room look incomplete or unfinished. If you are willing to spend a little bit more money, then there is another option for you.
One step up from foam panels is acoustic panels. Acoustic panels work the same way as foam panels, but they are a lot more aesthetically pleasing and also work better.
These acoustic panels come in a variety of colors and can actually be pretty stylish. They look a lot better than foam panels or thick industrial blankets. Obviously, this is a more expensive option than the first two choices.
You can install these acoustic panels the same way you would with the industrial blanket. It’s best to use self-adhesive hooks to prevent damage to your door.
The panels are not very heavy, so using two or three adhesive hooks should get the job done.
These acoustic panels can also be added all around the room the you are soundproofing which is another added benefit of using them.
Use a Rug to Help Absorb Noise

Adding a rug is like the cherry on the cake. A rug is both stylish and functional.
Placing a rug near the doorway will help reduce the amount of sound on the other side.
A nice thick, dense rug will help absorb sound and echos in a room and help reduce impact noise.
Although a rug can help reduce a lot of noise, it isn’t as effective as other methods.
Think of adding a rug as a supplement to your already soundproofed areas. You can even place rugs on both sides of the door to help increase the amount of sound that is absorbed.
Adding weatherstripping, a door sweep, and adding thickness to your door should be enough, but throwing in a rug or two can’t hurt.
A nice thick rug like this one would be great to use. This rug is extra thick and is made up of polypropylene fibers that make it strong and very durable.
This rug will last you a long time and can take a beating. It comes in many different colors and designs to suit almost any taste. The great thing about adding rugs to your home is that there is no installation.
All you simply need to do is find an area to place it, and that’s it. It adds style to your home and reduces sound all in one.
Just remember this is not a primary method used for soundproofing. Add rugs whenever you would like to supplement your existing soundproofing.
Replace Your Hollow Door with a Solid Wooden Door
This is it. Replacing your entire door with a solid wooden door means that you made it!
Replacing your door entirely can cost upwards of a few hundred dollars, depending on the style and type of door you are going after. A solid wooden door helps keep sound inside the room where you want it.
The main downside to this method is that it requires a lot of money that not many people may be willing to spend.
If you don’t mind forking out the extra money for a door and installation, then this is better than hanging an industrial blanket on a hollow door. Not to mention that it also looks about ten times better.
The best way to replace your door is to first take measurements of the current door installed in your doorway.
Take your measurements to your local home improvement store, and find an available customer service representative. Let the representative know the measurements of your current door.
They should be able to show you all the available solid doors they have that will fit in your home. Let them know the reason why you are specifically looking for a new door.
They may be able to point you in the right direction for the best solid door they have to help prevent noise leakage.
Once you have a door picked out, you can either install the door yourself or hire someone. If you are the do-it-yourself kind of person, then you can take a look at this awesome tutorial I found for replacing a door.
If you plan on replacing your door, be sure to seal it after you have installed the new door to ensure a nice and tight seal.
Final Thoughts
Soundproofing a doorway the right way is very important to any aspect of soundproofing your home. Home has many doors, which means knowing how to properly soundproof it is a must.
Start with sealing the entire doorway with weatherstripping material. Once your door is completely sealed, you will then want to move on to creating density.
There are many ways to increase the density of a door that I have discussed above. The most practical and functional way of doing this is to replace your door complete with a solid wooden door.
This may be pricey if you are planning on doing this to multiple rooms, so you can start with just an industrial blanket and slowly upgrade to solid doors you can.
Don’t forget to add rugs to your home as they help absorb and dampen sound as well. It’s not too hard to soundproof a doorway, but there are a lot of things you can essentially mess up on.
There are also a lot of methods I’ve read that is completely pointless, like putting soundproof curtains over your door or using caulking around a door frame.
I’ve even read an article that suggested putting mass-loaded vinyl on your door, which is mainly used to absorb impact noise.
If you have someone constantly pounding on your bedroom or bathroom door, yelling at you to get ready or get out, then I see this viable.
Otherwise, this is complete nonsense. There are just way more practical ways of soundproofing a doorway, and I hope my research and experience have helped you make a good decision.
